Before you begin
- A Windows 11 x64 PC or Apple-silicon Mac with macOS 15 or later, capable of running your own licensed X-Plane 12 and ToLiss Airbus. The current testing evidence is for ToLiss A320; other aircraft/versions require qualification.
- Quest 3 or 3S, a Meta account linked to the headset, and a USB cable that carries data.
- Meta Developer Mode and USB debugging are still required for the Companion’s USB forwarding even though Meta now installs the headset app.
- A physical joystick connected for the virtual sidesticks. The signed neutral virtual-controller solution is not included.
- The XPPanelsBridge command plugin for timed controls. The Mac Companion includes a guided plugin installer. Windows Companion 0.2.1-beta.1 also bundles guided command-plugin setup; install/update it explicitly with X-Plane closed.
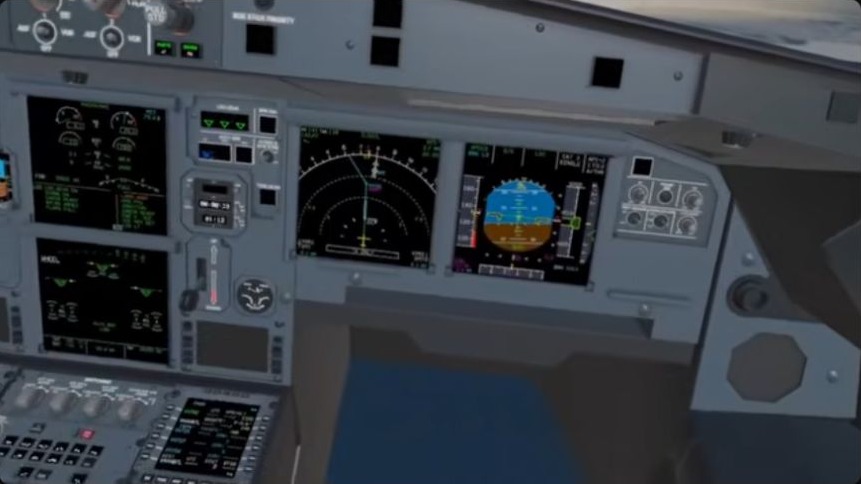
- Native ToLiss instrument pop-outs available for capture. Windows uses your existing display setup and has no bundled virtual-monitor driver yet. The Mac Companion includes an optional integrated virtual monitor; see the Mac instructions below.
The download is the complete XPPanelsVR application bundle for the supported beta configuration. It connects to your separately licensed X-Plane, ToLiss and Meta products; those third-party products are not included and do not endorse this independent project.
STEP 1
Install the Windows Companion
- Download the EXE and compare its SHA-256 with the release checksums.
- Windows may identify the independent self-signed publisher as unknown. Verify the checksum and signing certificate; keep SmartScreen, Smart App Control and antivirus enabled. If an organization manages the computer and blocks independent software, follow its approved installation policy.
- Close an older Companion before switching versions. Run the installer and select a new, empty installation folder. The Companion application installs per user without administrator rights. Your X-Plane plugin folder must also be writable; if it is protected, have your administrator install the plugin rather than changing folder permissions.
- The default folder is
%LOCALAPPDATA%\Programs\XPPanels Companion\0.2.1-beta.1. The installer creates application shortcuts and a normal Windows uninstall entry. - Launch the Companion and choose your
X-Plane.exe. To install the command plugin, disconnect Cockpit and quit all X-Plane instances, then choose Check plugin → Install / Update Plugin. Confirm the action. Recognized existing plugins receive a verified backup. - Wait for “Plugin installed. Start X-Plane to load it.” If plugin setup refuses a custom or modified plugin, keep a manual backup and contact support instead of deleting unknown files. Start X-Plane yourself afterward. Companion starts with sharing off and does not launch the simulator. Keep the previous Companion folder as rollback.
The EXE is the complete Companion installer. Plugin setup runs separately inside Companion because it changes the selected X-Plane installation only when you request it. Use Restore Previous Plugin or Remove Plugin with X-Plane closed. Removal requires an intact managed receipt. Modified plugins, unknown/custom files, links and junctions are refused. Verified backups live in %LOCALAPPDATA%\XPPanelsVRCompanionWindows\PluginBackups. Existing settings and display mappings are retained.
STEP 1B · macOS
Install the Mac Companion
- Download the PKG and compare its SHA-256 with the release checksums.
pkgutil --check-signature should report a Developer ID Installer identity and trusted Apple notarization. - Quit X-Plane and any older Companion. Open the PKG and install XPPanelsVR Companion in Applications. The package is for Apple-silicon Macs running macOS 15 or later.
- Open Companion from Applications. Grant Screen & System Audio Recording when requested; restart Companion after macOS asks. Accessibility is needed for automatic pop-out placement and ISCS click forwarding. Local Network is used only for an explicitly approved connection on your trusted private network.
- In Companion Setup, select your X-Plane folder and choose Install / Update Plugin. The included XPPanelsBridge is backed up and replaced through the guided installer; restart X-Plane afterward.
- For an optional Mac virtual monitor, create XPPanelsVR Outside in Companion before starting X-Plane. In X-Plane Graphics, select that display for the main scenery view. Keep it attached throughout the flight and quit X-Plane before removing it. You can instead use an existing display.
- Keep the previous installer as rollback until the Mac, Quest and simulator have passed your checks. Use this page’s Quest-compatible Mac PKG, rather than substituting an older Vision Pro Companion download.
The PKG is the complete Mac Companion installer and places /Applications/XPPanelsVR Companion.app on the Mac. X-Plane, ToLiss and the Meta-managed Quest app remain separately installed products.
STEP 2
Install from the Meta-managed Beta
- Open the XPPanelsVR private Beta invitation while signed in to the Meta account linked to your Quest.
- Confirm you are at least 18, accept Meta’s release-channel terms and press Join release channel. The request initially shows Pending approval.
- Wait for AldoApps to approve the request. Reload the invitation page after approval and press Install on device. Select your Quest if Meta asks.
- Keep the headset powered and online while Meta installs XPPanelsVR for Quest. Future channel builds update through Meta and the channel requires its latest build.
- For the Companion connection, enable Developer Mode, connect the USB data cable and accept Allow USB debugging inside the headset for your own computer. Keep Quest awake during first connection. If authorization is missing, unplug/reconnect USB and check inside the headset; a charging-only cable will not work.
- Launch XPPanelsVR from the Quest Library and allow hand-tracking/OpenXR permissions when requested. Quest Link or Air Link is not used.
The package ID is com.aldoapps.xppanelsquest. The Meta build is non-debuggable, production-signed and supports Quest 3/3S. An older direct development APK cannot update in place because its signing certificate differs; back up any settings and uninstall it once before the Meta build.
Direct APK fallback for development
The GitHub release retains the accepted development-signed APK for technical fallback. It requires manual checksum verification, Developer Mode and ADB installation, appears under Unknown Sources, and cannot update the Meta-signed build. Use only one signing channel at a time.
STEP 3
Connect the cockpit over USB
- Start X-Plane yourself and load the supported ToLiss aircraft. Keep only one X-Plane instance running.
- Open and detach the nine ToLiss instrument pop-outs: Captain PFD/ND, First Officer PFD/ND, upper/lower ECAM, MCDU 1/2 and ISIS. Keep source windows available and unminimized. On Windows, select the running
X-Plane.exe and click Connect Cockpit. On Mac, confirm the X-Plane folder/plugin in Setup, then start sharing and connect the cockpit. - Enable Allow live cockpit controls when you are ready to use them. Controls require fresh simulator feedback.
- Keep the desktop Companion and the native Quest app open for the whole session. If multiple headsets are attached, select your intended device in Companion. The Companion automatically manages two local USB routes: TCP
49200 for media and 49310 for controls. They remain on the computer/USB connection and require no router changes. Optional Wi-Fi fallback is for a trusted private LAN only. Never port-forward either route to the internet. - Look for all nine rows to report Ready in Quest. Fresh computer images and fresh headset decode reports are separate checks.
- If an instrument is missing, use its Repair button or Repair All Displays. Repair sends popup commands only when you request it; do this when appropriate for your flight.
MCDUs must show the LCD only, not a squashed keyboard/body. Current capture includes the crop-recovery and intermittent-stall fixes.
If the status says Quest source unverified, wait for connection to settle. If it persists and a legacy ToLissDisplayBridge plugin is enabled, use X-Plane’s Plugin Admin to disable only that media plugin. Keep XPPanelsBridge enabled: it handles cockpit commands. Do not run a separate legacy bridge/helper beside Companion.
STEP 4
Enable the media you want
- Outside view
- Enable Allow outside view sharing in Companion and Outside view in the Quest menu. Leave the main X-Plane window available and unminimized. On Windows this beta uses H.264 Economy (up to 2560 × 720, 30 source fps); higher-quality modes and a managed virtual monitor are not included. Ambiguous sources are rejected; select the ISCS source if an open dialog makes outside selection ambiguous.
- Audio
- Enable Allow X-Plane audio sharing, then cockpit audio in Quest. This captures X-Plane process audio, not the microphone or the whole desktop mix. A “ready” status does not replace a listening check.
- ISCS on either EFB
- In ToLiss Settings/Account → User Interface, enable USE POPOUT WINDOWS FOR POPUPS and SAVE POPUP CONFIG IN QUIT, then save preferences. Open and detach ISCS yourself. Enable ISCS sharing and explicitly select its window in Companion. Open ISCS on the desired EFB in Quest. Keep the desktop ISCS window foreground and its touch point uncovered for clicks; a hidden or covered window cannot receive reliable mapped touches. With X-Plane full screen, bring the detached ISCS window forward yourself if Windows denies the foreground request. Re-entering ISCS on the EFB prepares the selected source without an open/close toggle.
STEP 5
Check your first session
- Park safely before trying controls. Confirm Companion reports a fresh control session and all nine rows say Ready in Quest.
- Inside Quest, check that each instrument updates and that both MCDUs show only their LCD area. Computer readiness alone does not prove that you see the correct image.
- Try one suitable Captain and one First Officer control, check that X-Plane responds, and return both to their original settings.
- If enabled, check that scenery updates, listen for X-Plane sound, and test a harmless ISCS page change from the EFB. Keep its detached desktop window foreground.
- If USB drops, keep Quest awake, reconnect the cable and follow Companion’s recovery/authorization status. If one display remains missing, use its individual Repair; use Repair All Displays only when appropriate for your flight.
Confirmed on the development Windows 11 / ToLiss A320 / Quest 3 setup on 15 October 2026: plugin installation and loading, Captain and First Officer controls, ISCS and audio with Meta beta build 20002. All nine streams also passed fresh capture and Quest decode checks. This is a sampled acceptance pass, not a guarantee for every computer or aircraft version.
Update, rollback and uninstall
Download a matched Companion, check its hash and close the older Companion. On Windows, install the new version into a new folder. On Mac, quit X-Plane and Companion, then run the signed PKG; it upgrades the application in place. The Meta Beta updates the Quest app through Meta and requires channel members to use its latest build.
The first move from the direct development APK to the production-signed Meta build requires one intentional uninstall because Android will not mix signing identities. Removal can erase local headset settings. After migration, stay on the Meta channel; do not install the differently signed direct APK over it.
On Windows, optionally restore/remove the managed plugin in Companion first with X-Plane closed, then use Settings → Apps → Installed apps or Uninstall.exe. Uninstalling Companion does not remove the simulator plugin or its backups. On Mac, first remove the plugin through Companion Setup if desired, then quit the app and move it from Applications to Trash. Saved computer settings, logs and plugin backups remain until removed separately. Neither method removes the Quest app.
 XPPanelsVR